bg

Monday, November 24, 2014

Altered art - Wooden star mirror plaque

I have had a project in my head for quite a while now, to make for my friend who helped me out so much during my move.
The project went through a lot of modifications in my head due to not having the right tools or finding the right pieces to put it together, but finally, it came together a couple weeks ago!

I found a star shaped "tray" thing at Hobby Lobby. I forgot to take a picture of it before I added the paper and accents.  It was in the wood section and it was about 12" wide and had a white washed finish on it.  It has a frame around it so it looks like the inside is recessed in like a shadow box.  A nice feature to be able to transform it into something useable.
I decided to make the inside a mirror.

Here are the final pictures of it.


I mod podged paper all over.  Just various rustic styles of papers, like wood and old maps.

I had to find a way to fashion a mirror on the inside.  I was looking around at those cuttable mirrors, but felt those just probably wouldn't be reflective enough. I wanted a real looking mirror.  So I found this lightweight plastic reflective material on ebay, but it was sold as a square.  I asked if they could laser cut it for me to a specific pattern of a star.  They said they could for a nice cheap price for me, so I measured and drew up the star shape that would fit inside the wood frame, and sent them the Illustrator file for their laser cutter machine, and then a week later, I got the mirror star in the mail!  I was so happy it was a perfect fit.

Then I need to make behind the mirror a magnet... I tried those cuttable magnet sheets, but those weren't strong enough to hold a magnet on the outside.  So I used the really thin and strong eco magnets from Sun and Moon crafts underneath the mirror. I used one under each star point and then one in the middle where I wanted to be able to magnet a mustache on. This just made the whole star stay at the same level.  I used the strong glass adhesive from Sun and Moon to hold the magnets inside down and the glass star on top, had to let it dry for a day.

I used some mustache die cuts and also some mustache SVG cut shapes and made paper mustaches. I doubled up the mustaches, gluing 2 cardstock pieces together to make them stronger, and then a magnet on the back.  I made her 4 different mustaches so she can change them out and look in the mirror to "mustache herself".  Haha, just for something fun!

She can hang it up too.  I went to my hoard of SU Hodge Podge pieces and grabbed a couple hangers and found some tiny screws somewhere (that was a miracle I found them in the house!  I didn't have to go shopping to buy any) and managed to get those little buggers screwed into the back.

For accenting, I used the little rope (I think that was from SU a couple years ago) and some rusty florist wire (that I've had for about 15 years!  I knew that stuff might come in handy one day, so glad I didn't throw it out) to secure each point of rope.  Then I screwed in the metal hangers on the bottom for her to hang keys or something on.  That was a little hard due to the angle of the star, but I managed to get them pretty straight.

So on her gift, I used 6 of her favorite things on the star mirror (rope, wire, wood, old map, mustaches and star shape), and then I bought her a 150 yard roll of linen thread to add to her gift, since she also uses linen thread on almost everything.
In all, 7 of her favorite things used for her present.  She said she liked it, so it made it all worth it.  It was a lot of fun making this!  A long process, with all the inbetween drying times and waiting for mail order, but I just love how it turned out.
I may need to get some more supplies and make one for myself!
~~~~~~~~~~~~~~~~~
I'll actually have some cards to share the next time I post on December 1.
Thanks for stopping by and visiting!

Tuesday, November 4, 2014

Appreciation Card "Book" for Pastor

Hello
If you are still a follower, well then, I THANK YOU!  I haven't posted in FOREVER.  Although I always have great plans to get back to crafting, which is my favorite thing to do.   I probably mentioned last time that I had been in the middle of preparing a house to sell and purchasing a new one 130 miles away, and with the task of moving everything to a smaller sq. ft. home, it was quite a job for us.
I finally got my craft room unpacked in the beginning of September with the help of a friend of mine whom traveled from our old town just to help me with it.  And I have a cute project in the works for her as part of a thank you for all the help she rendered while we were selling the house and moving and the unpacking/setting up my craft room.  I will be posting that in a couple weeks. And this is certain, as I have to get the item finished by this next weekend. :o)

I have been so busy digitally drawing and digitally coloring many new products for Doodle Pantry, that I haven't made any cards or anything crafty.  I am vowing to change that and force myself to craft at least once a month beginning in January! (One of my resolutions...)

ON TO MY PROJECT:
With Pastor appreciation month having been in October, I was able to spend a day creating for him a special card that looks like a book.  In order to have room for everyone in the church to write him a little note of thanks on the inside, I had to get some "pages" in there, so the "book" theme actually made sense.
So here's what I created and it pretty much took up an entire Saturday, but it was worth it and so much fun to do!
I have included supplies and measurements of the papers at the end, and hopefully enough detail that you could design your own. But really, you can make yours any size.
 ~~~~~~~~~~~~~~~~~
First I decided on the size based on an envelope that I happen to have. I can't remember where I got the envelope, but the envelope was about 5-5/8 x 8-5/8.
Above:  I made my card base (after folded) 5-1/4 x 8-1/4 since I knew it was going to be between 1/8" and 3/16" thick, with all the pages and layers. I wanted it to fit snugly but not too tight into the envelope. EXCEPT I cut my base at 10-5/8" x 8-1/4" and scored the first at 5-1/4" and then scored 1/8" away from that. After folding on the scores, you end up with the size mentioned above with a 1/8" "binding".

The chocolate front layer which everything is adhered to is 5-1/8 x 8-1/8.  The blue patterned paper (which is actually from the Deer Trio product), is cut at 5 x 8.  The brown pattern paper triangles (also from the Deer Trio set) are actually two 1-1/4" squares that were cut in half on the diagonal.  Then I placed them in the corners and tacked them down and sewed over them.  You have to cut 4 squares and cut all in half to have enough triangles for front and back covers. (If you want it to look like an old fashioned book)

For the decorative frames:  I used Card Cut 6 SVG cut for the frames around the image and sentiment.  I had to open the SVG in Adobe Illustrator first and widen the frames so that my (already printed!) image would fit in there. LOL.  I didn't check the ratio of the frame before deciding and printing my images.  That's OK, I was able to widen the frames and then cut the widened SVG frames on my ZING cutting machine.  I cut all the pieces on 3 colors of cardstock so that I could hold them over the image until I found a good combo of the layering of the pieces.
 ~~~~~~~~~~~~~~~~~
 I made my own sentiment, it was not within a product set (hint: BUT IT WILL BE SOON!).
 ~~~~~~~~~~~~~~~~~
For the image, I used Photoshop.  I pulled in the patterned paper from the Pen & Ink product and put it on layer 1.
Then I made a layer 2 and placed the pen & ink image there, centered.
Then I wanted to erase a little around the image but not completely, leaving a hint of the pattern behind it. Here's how I did that.
1. Switch over to layer 1
2. Select the icon to "erase"
3. Set my brush to be the #1 brush (the first one at the top and to the left of the default brushes)
4. Then set the hardness of the brush to the softest setting (the slider all the way to the left).
5. I went to the icons at the top of the Photoshop window, and where it shows the opacity value (defaulted at 100), I set it at 70.
6. I then clicked and held down while I moved the curser over the image, but since I was "on" layer 1, it only erases at 70% opacity, the pattern layer.
 ~~~~~~~~~~~~~~~~~
I sewed on the image panel and the sentiment panels and set them aside.  I adhered everything else to the chocolate base (5-1/8" x 8-1/8") except the brads, and sewed around that. Then I used foam dimensionals to stick on the panels and stuck brads in the corners thru the front cover.
~~~~~~~~~~~~~~~~~
Above: This is the back cover.  I decided the book needed to have a similar back cover as the front cover, just to help keep it looking like a real book.
~~~~~~~~~~~~~~~~~
I had forgotten to take a picture of the inside of the covers. After all was assembled and sewn, front and back, I adhered to the inside of each cover, a 5-1/8" x 8-1/8" piece of the blue patterned paper from Deer Trio.  This way, I could cover up all the brads poking thru the front, and also cover up the sewn on "bookmark" on the back cover (explained below).
~~~~~~~~~~~~~~~~~~
For the "pages", I used Photoshop to create a rectangle in the ratio of my card, then created the white rectangle in the center so that it was a frame of the pattern. I saved the file as a JPG and inserted these into a Word document to print 2 to a sheet, but a 2 sided sheet so that the frames were on front and back, and folded the sheets in half, and left room around the frames since I knew I was going to trim the sheets to fit inside the card book.
I used my 1/16" hole punch to punch 3 holes evenly through the crease of the pages and the binding on the cover (card base).  I used twine thread thru the top and bottom holes and tied in the center and then used a small piece of twine to go thru the center hole to secure in place the vertical twine.
 Above: I cut a piece of ribbon and sewed it to the inside of the back cover, BEFORE sewing the patterns and triangles on the back.  I made sure it was long enough to go all the way through the card book and then cut the banner points on the end.
~~~~~~~~~~~~~~~
SUPPLIES:
  • Photoshop
  • Color printer
  • Patterned paper from Deer Trio and Pen & Ink
  • Image from Pen & Ink
  • Sentiment generated in Word document
  • PTI cardstocks (Navy, Chocolate, Spring Rain)
  • Neenah white cardstock for image/sentiment
  • Plain copy paper for pages
  • Small hole punch or piercer
  • Ribbon (I used PTI satin ribbons)
  • Decorative frames derived from Card Cut 6 SVG
  • Linen thread
  • Aged copper brads
  • Foam dimensionals
  • Sewing machine

Thank you for visiting me today. I hope you have been inspired to go create too!

Sunday, June 1, 2014

Manly Magnet set and a Moneky Baby card

Wow, I didn't realize it has been almost 3 months since I posted anything!
I haven't been able to create much anyway, we are preparing to sell the house and move 2 hours away, and almost all my spare time has been declutter packing, cleaning, painting the house (with the help of a dedicated friend!) and other odd end fix-it jobs for the house.
Now most of my craft room is packed away!

MANLY MAGNETS

I had my magnet making supplies saved out since I knew I was going to be making my dad a set of car magnets for Fathers Day.  He works on cars and has for at least the past 35 years, and he has his own auto shop, so I wanted to make him these for his shop fridge.  The next Doodle Pantry Challenge is having a theme of "Make it Manly", starts at noon today on the Doodle Pantry Blog, hope you can join in!

I used the Classic Cars 1, Classic Cars 2, and the new Classic Cars 3, as well as the Hotrod Pickup, Vintage Auto, Classic Corvette, and one of the motorcycles from Motorcycle Mania.

I printed the color versions onto Neenah 90 lb. cardstock and followed the instructions over at Sun & Moon Craft Kits for making the magnets. ALL my magnet supplies I got from them as well (glass pieces, magnets and glaze to adhere it all together).

~~~~~~~~~~~~~~~~~~~~~~~~~~
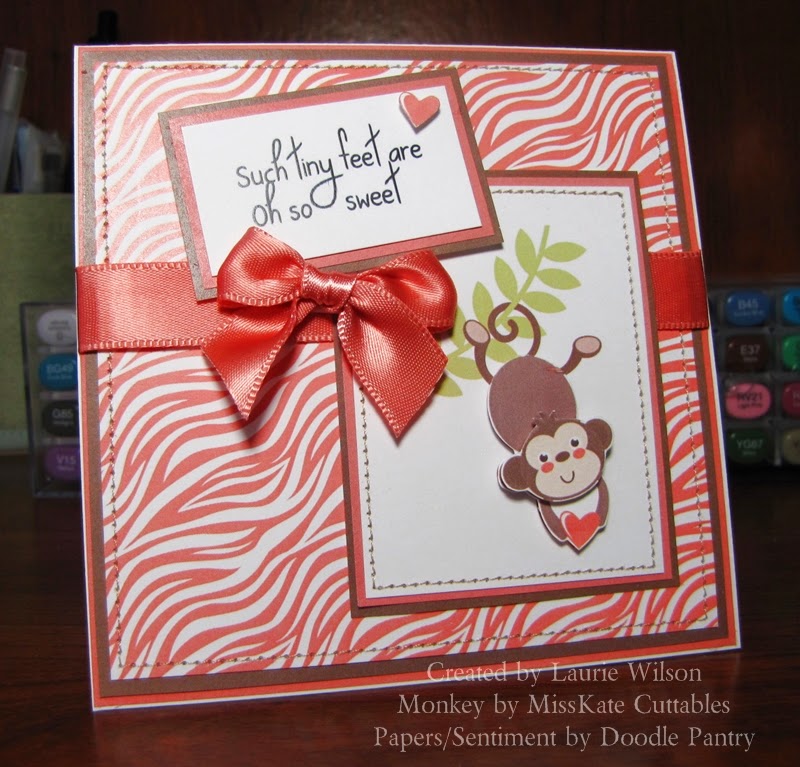
MONKEY BABY CARD (with nothing other than paper, adhesive, a little ribbon, and my trusty color printer!)

I needed to make a card to go with the little gift I got for my daughters second grade teacher. She is going to have a baby over the summer and it's a girl and my daughter was all excited to get to give her this gift before school lets out.
Now I must inform you that almost all my "stuff" has been packed away.  I have NO dies, NO punches, NO embellishments except for a few spools of ribbon on hand, NO color cardstock (only white), and NO e-cutter machine.

I had very LITTLE to work with!  Pretty much just white papers, adhesive, and a few colors of ribbon to choose from. Oh, and good thing I still had my sewing machine out and plugged in since I still have to cut the sleeves off some of the kids shirts to make them some short sleeve shirts out of the winter shirts (Gotta get as much use out of the winter clothes as possible!).

Luckily, I found this adorable monkey at Miss Kate Cuttables and all her stuff comes in PNG/JPG as well as SVG cutting files.

Here's my card:

So, I printed the monkey after changing the color of the pink cheeks and heart in Photoshop to a melon-ey, coral-ey shade.

I then matched that coral color and printed a full sheet of the coral, then a full sheet of the brown on the monkey, and then I pulled in the Zebra print from Going Wild Digi Paper Pack and changed the color of the stripes to the same coral color that I needed and printed a sheet of that.

So all this card was printed out and cut.  Them I sewed the sections and added my ribbon. Since having NO embellishments, I happened to print an extra monkey with the heart and cut out the heart to add over the sentiment.

Supplies:
Sentiment from Baby Shoes by Doodle Pantry
Zebra print from Going Wild Digi Paper Pack by Doodle Pantry (color altered to be coral/melon)
Monkey by Miss Kate Cuttables (pink color altered to be coral/melon)
Neenah 80 lb cardstock
Printer Paper
Color Printer
Sewing Machine
Foam dimensionals and adhesive
PTI ribbon
~~~~~~~~~~~~~~~~~~~~~~
That's all I had for today, I hope you were inspired by something to go get crafty and bless someone else with your cards and creations!

Tuesday, April 1, 2014

Encouraging Cross card set

Good morning!   There's a release of new products at Doodle Pantry today and I was able to create a set of 4 Cross shaped cards using the new Card Cut Cross SVG and the Floral Cross image set from March release.
Here's the first 2.
All the cross shape pieces were cut using the Zing e-cutter and Make-the-Cut.
All I did was center and line up all the cut pieces! So easy and so pretty!
 I even prettied up the insides!
 Here's the other 2.
 insides:
 They were pretty quick to pull together with the SVG cut matching the shape of the Floral cross exactly.
Supplies used-
  • Images and SVG: Floral Cross, Card Cut Cross SVG
  • Cardstock: PTI new leaf, dark chocolate, white, blueberry, digi paper from the Floral Cross set
  • Accents: miscellaneous ribbon and buttons, mini brads, foam dimensionals, SU flower punch and oval punches, EK fern punch
  • Other supplies: printer, Zing e-cutter, Make-the-cut software
Thank you for visiting me today.  I hope you are inspired to go get crafty with your stash!

Wednesday, March 12, 2014

Somethin's Fishy Birthday card and magnets

Time to make FIL a birthday card and since they are fishers constantly entering local contests and have many a fish mounted on their walls, his card had to have a bass fish on it.
I also wanted to make a nice set of matching magnets.
I am on a magnet making CRAZE, I know!

My card is for the Sweet Sketch Wednesday 2 Challenge that Doodle Pantry is sponsoring this week!
They had an awesome sketch for it and it worked so well for my image.

Here's the card.  You can't tell from this angle, but I printed a couple of the Bass Fish out and fussy cut and layered them up.  I used a glue dot in the middle of the fish and then dimesionals on the tail and head so it appears he is flapping off the card.
 and here's the inside.  The inside sentiment is from PTI little hexagon stamp set.


Here's the magnets.  Sorry for a dark photo, I took picture in the evening.

How I did these:
1. I modified the digital color image and erased the water parts so that just the fish was left.  I saved just the single fish image
2. In Photoshop, I created the background on layer 1 to match the digital paper in the set
3. Inserted/placed the single bass fish on layer 2
4. I created my own text on layer 3 and colored it white
5. For each saying, I "saved as" the modified image(s) from Photoshop as JPG, so that I could use them later
In a new Word document, I placed all the 8 new combined fish images and sized them down to about 1.25" wide.  Printed the images and then made the magnets per the Sun and Moon tutorial.
Easy peasy!  Just a little time consuming, but that's OK, they turned out great.

Supplies for card and magnets:
Image and digi paper: Bass Fish
Stamp for inside sentiment: PTI Hexagon stamp set
Cardstock: Neenah white, PTI kraft and SU Taken with Teal
Ink: Printer and Taken with Teal for the inside sentiment
Accents/Tools: Linen thread, sewing machine, bitty brads, foam dimensionals
Magnets:  Glass ovals and rectangles, Glaze, Rare earth magnets, printed images


Monday, March 3, 2014

Purple Peacock Wedding Shower Card

Hello!
I made a wedding/shower card for a shower this past weekend.
The colors in the digital set Pretty Peacock were not quite what I needed for the card, because the bride likes different colors, but I really wanted to use the image and papers in the set.

So I changed the colors using Photoshop and did a tutorial for it over on the Doodle Pantry Blog HERE if you are interested in seeing that.  I also referenced a outline color change tutorial done by someone else for the outline image changes.

If you just want to see the card, here are all the views of it and supply list at bottom.
I changed the black outlines to purple/violet and then modified the digital paper to be a coordinating shade.
The card was pretty simple to put together, with the handy SVG shape Card Cut 2 SVG. Sure made it quick, but really pretty!
INSIDE:


Material supply list for my card:
Images and digi papers: (modified colors digitally) Pretty Peacock
Shapes and cuts:  Card Cut 2 SVG 
Cardstock: Neenah white and PTI royal velvet and wisteria
Ink: Printer 
Accents and Tools: Wild Orchid flowers, pearls, stickles, sewing machine, SU ribbon, foam dimensionals, Crealies die CLCS12, Tacky glue for flowers 

Thank you for visiting today!  I hope you are able to checkout the tutorial over at the Doodle Pantry Blog for the paper color changes.  Wishing you a wonderful, safe and warm week!


Saturday, March 1, 2014

Moose Magnets and a Card

Good morning!
I love Lodge style themes and happen to have that theme going on in my own house, and I needed some Moose magnets for my fridge.
I used the new Northern Outdoors Silhouette and SVG set, the Classy Styles Digi Paper and the Layered Frames SVG/PSD/PNG to digitally create the images within Photoshop (I layered and masked/clipped the frames and papers), then printed them out the size of my glass pieces, and then made magnets out of them.
I used the instructions and got all supplies (glass, glaze and magnets) at Sun & Moon crafts.

~~~~~~~~~~~~~~~~~~~~~~~~~~~~~~~~~~~~~~~~~~

Next, I had to use the new Card Cut 4 SVG!   It goes so well with the Carousel series images I am working on.  I used Carousel Horse 2.
I used PTI cardstock, the pre-color image and digi paper included in the Carousel Horse 2 set, pearls, ribbon and button from PTI, and foam dimensionals to pop up the first layer.  Of course, I had to add a little sewing around the main image too.  :o)
~~~~~~~~~~~~~~~~~~~
Thank you for taking a little time to visit my humble crafty blog!  I hope you are inspired by something and hope to see you soon!

Monday, February 10, 2014

Mice Magnet set winners!

Don't you get blustered when you think you scheduled a post, and then find out a day or two later that it didn't?   Yep, That's me today!

The WINNERS drawn for the Mice Magnet sets I made are commenter #'s  13 and 20, who were Terriavidreader and Georgia Ehrmann!
I will be mailing these out just as soon as I hear from you. Please email me from the same email that is used on your Doodle Pantry account and include your mailing address.

Thanks so much to everyone for coming by and visiting me and for making such nice comments!

Thursday, February 6, 2014

Spring buddies cards

Hello!
Today, I am pretty excited.  My card made it published to the Complete Cardmaking Magazine, along with 7 other Doodle Pantry Design Team members, as a feature spread.  This magazine comes with a CD of images provided by the featured companies, how cool is that?
Here is where you can order a copy from MoreMags.

Here's the cards I made.  
All the supplies details are to be found in the magazine details.
I made one card using the outline images and watercolored it with my Tombow markers and a waterbrush, and then made a small set of 6 cards using the pre-colored images. All patterned papers are from the digital sets I used, Bunny Wabbit Color+ and Fuzzy Duckling Color+.

Here is the hand watercolored card.  The sentiment is a freebie you can get here.
 Set of cards using pre-colored image graphics included in the products.

I hope you can get the magazine, there are so many fabulous ideas in there and getting a CD filled with digital stuff is awesome!
~~~~~~~~~~~~~~~~~~~~~~~~~

Saturday, February 1, 2014

Some cards and 2 Mousy magnet sets giveaway

I am excited that I got to create some stuff to share today!

MOUSE MAGNET SETS   (I am giving 2 of these magnet sets away!  If you want one, just comment on this post and I will randomly select 2 winners next week, Feb 8)
Who likes mice when they aren't nesting in your walls and running through your cupboards?

These magnet sets are using Berry Nice Mice, Cherry Nice Mice, So Sweet Mice and the new Salty Snack Mice.  I printed the images with a Dell laser printer onto Neenah cardstock.
35 mm squares
 30 mm circles

I made several sets of 8 mouse magnets each. I used THESE glass square tiles and THESE glass circle tiles  that I bought from Sun & Moon crafts, and the magnets that I used on the back are also from Sun & Moon crafts. These magnets are the best!  They are super thin and stronger than those big black glob magnets at walmart or local craft stores, and I like that they are silvery in finish and not black chalky feeling.
I used Sun & Moon glaze to "glue" the printed cardstock to the backs of the glass and then used the same stuff to "glue" the magnets to the back. They took a couple hours to completely dry.

I will give 2 Mouse Magnet sets away!  One set is circles and one is squares.
I will randomly select 2 commenters on this post on February 8.  I do not have any container for them, but I will make sure they are securely wrapped for shipping so that they don't break in transit.

SCHOOL KID VALENTINES
I make my kids valentines cards that they pass out at school. Sure, I could buy the ones from the store and make it less time consuming, but I like to be different, and my kids LOVE that they get to "help" choose images and put them together.
I used the new MINI MAZES to make a strip of 3 little mazes to put on the inside of their valentines. My kids LOVE mazes and I figured their friends do too!
I used Silly Critters from last month for the fronts/outsides.

TEACHER VALENTINE CARDS
The kids teachers get special cards this year.  I used Lori M's Card Cut Window SVG set and combined with several Doodle Pantry floral pre-color images.  How fun it was to make these cards!  I got to use my new Zing cutting  machine and Make-the-cut to create these.
I made the teachers matching keychain/zipper pulls using glass domes and bails and hooks.
This one uses Bird of Paradise Color image

 Here is a pretty using the Jacaranda color image.
 Love the bright and cheerful yellow of the Palo Verde.
 And the red poppies flowers printed a nice red, but the photo didn't seem to capture it, looks more orangey in the photo.
For the insides, I used a new FREEBIE sentiment for Valentine's Day and some cute flower and sprig dies I got from Taylored Expressions.


Thanks for visiting me today and I hope you are inspired to bless someone with a handmade card or gift!